A smart blind that looks perfect in the box can still disappoint once it reaches the window. The most common problems are not about the motor or the app – they start with a bracket that is slightly off, a shallow frame, or a power plan that was never thought through. If you are researching how to install smart blinds, the real goal is not just getting them up. It is making sure they operate quietly, sit level, and work reliably every day.
Smart blinds add convenience, cleaner lines, and better light control, but they also ask for more precision than a standard manual shade. That is especially true in condos, larger window openings, and spaces where design matters just as much as function. A neat install protects the look of the room and helps the technology feel worth it.
Before you install smart blinds, check the window and power plan
The first decision is whether the blind will be mounted inside the window frame or above it. Inside mounts feel tailored and minimal, which is why they are popular in bedrooms, living rooms, and condo spaces. But they only work when the frame has enough depth and the opening is square enough to avoid rubbing. If the window is tight, uneven, or interrupted by cranks and handles, an outside mount often gives better performance and cleaner coverage.
Power matters just as much as placement. Some smart blinds use rechargeable battery packs, while others are hardwired. Battery-powered systems are easier to retrofit because they do not require electrical work, but they still need practical access for charging and enough clearance for the motorized headrail. Hardwired blinds create a very clean finished look, though they make the most sense when planned during renovation or new construction.
This is where many homeowners underestimate the project. A blind is not just covering glass. It has to clear trim, align with the casing, and sit where the motor can operate without strain. In condos and commercial spaces, there may also be rules around drilling, access, or electrical modifications.
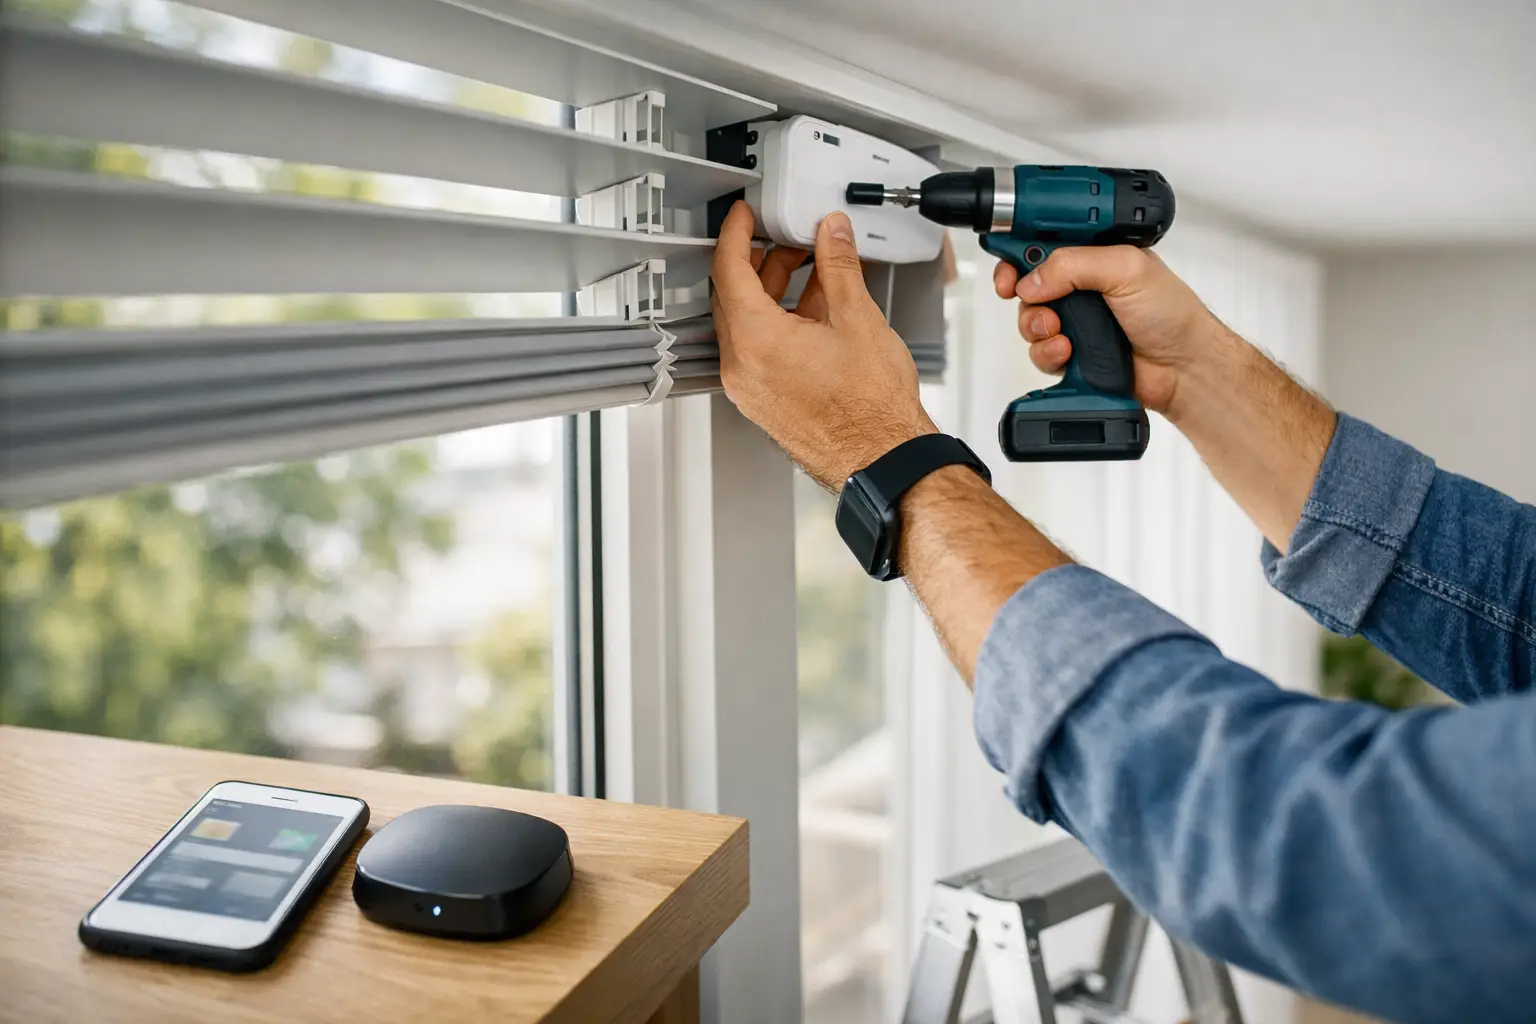
Tools and prep for how to install smart blinds
You do not need a long tool list, but you do need the right basics. Most installations call for a drill, level, measuring tape, pencil, screwdriver, and the correct anchors if you are not fastening directly into solid wood. A step ladder helps for larger windows, and a stud finder can be useful for outside mounts.
Before any holes are drilled, confirm the actual width and height of the blind against the order details. Custom products are made to fit a specific opening, so even a small measuring mistake affects how the final install looks. Also inspect the hardware included with the blind. Motorized systems often have model-specific brackets, clips, charging cables, or pairing instructions that should be reviewed first rather than sorted out halfway through the job.
If the blind is battery powered, it is smart to charge it before installation if the manufacturer recommends it. That avoids trying to troubleshoot a low battery after the blind is already mounted.
How to install smart blinds step by step
Start by marking bracket positions carefully. For an inside mount, brackets are usually placed near the top corners of the frame, with exact spacing based on the headrail design. For an outside mount, the blind should extend enough beyond the window opening to improve privacy and light control. Mark both sides and use a level to make sure the line is truly straight. Even a small tilt becomes obvious once the shade starts moving.
Next, pre-drill pilot holes where needed. This helps prevent splitting and gives the screws a cleaner path, especially in wood trim. If you are mounting into drywall or a surface that needs extra support, use the proper anchors rather than relying on standard screws alone. Smart blinds are not excessively heavy in every case, but the motor and repeated movement create more demand on the brackets over time.
Install the brackets securely, then test them by hand before lifting the blind into place. They should not shift or flex. The blind can then be snapped, clipped, or slid into the brackets depending on the system. At this stage, avoid forcing anything. If the headrail is not seating properly, the issue is usually bracket alignment rather than the blind itself.
Once mounted, check that the blind sits level and centered. Run it up and down before completing any trim pieces or side covers. Listen for rubbing, watch for uneven rolling, and confirm that the fabric or slats are tracking properly. A smart blind that binds slightly on day one will not improve with time.
Setting up the motor, remote, and app
Mechanical installation is only half the job. Smart blinds also need to be paired and programmed correctly. Depending on the product, that may include connecting a remote, setting upper and lower limits, syncing to a hub, or linking with a phone app and voice assistant.
This part sounds simple, but it can become frustrating if the physical install is not clean. For example, if the blind is not level, the motor may still respond to commands, but the shade may stop unevenly or leave inconsistent light gaps. Good setup starts with good mounting.
Follow the pairing sequence in order. Many systems require a reset or a specific button press pattern before they can be discovered by the app. Once connected, test both manual and scheduled operation. If you plan to automate morning and evening light control, verify that the blind reaches the exact preferred positions rather than fully open or fully closed every time.
In larger homes or office settings, signal range can also matter. A blind near concrete walls, metal framing, or farther corners of the space may need a better hub location or a stronger network plan. Technology should feel convenient, not temperamental.
Where DIY works and where it gets tricky
Some smart blind installations are very manageable for an experienced DIY homeowner. A single standard-sized window with a battery-powered roller or zebra blind is usually straightforward if the measurements are accurate and the frame is suitable. If you are comfortable with a drill, patient with leveling, and willing to follow setup instructions closely, you may get a clean result.
The project becomes less forgiving when the windows are oversized, the mounting surface is concrete, the trim is uneven, or multiple blinds need to align across one room. Hardwired systems add another layer because they involve planning beyond the window itself. High-rise condos can also introduce practical challenges such as limited access, concrete construction, and stricter expectations around a polished finish.
That is why professional installation is often less about convenience alone and more about protecting the final outcome. In a design-forward room, small errors stand out. A blind that sits a quarter inch off can affect symmetry, light filtering, and the overall feel of the space.
Common mistakes that affect performance
The most frequent installation issue is inaccurate measuring before the product is even ordered. After that, the next problem is rushing bracket placement. If the brackets are not level, the motorized blind may still function, but it will rarely look as refined as it should.
Another common mistake is ignoring clearance. Window handles, deep trim, protruding sills, and condo frame details can all interfere with movement. The result is a blind that bumps, catches, or cannot lower fully. It is also easy to overlook power access, especially with rechargeable systems installed high over large windows.
Finally, some people treat app setup like an optional extra to finish later. That often leads to missed limit settings, poor remote response, or features never being used at all. Smart blinds are at their best when the installation and automation are planned together.
A better fit for custom spaces
In custom homes, condos, and professionally designed interiors, smart blinds tend to work best when they are selected and installed as part of the room, not as an afterthought. Fabric choice, light control, privacy needs, and motor style all affect how the finished window looks and performs. A bedroom needs a different approach than a sun-filled living room or a client-facing office.
That is why many property owners prefer a full-service process. With custom measuring, product guidance, and installation handled together, there is less guesswork and far less risk of ordering a system that technically fits but does not function the way the room needs. For homeowners in the Toronto area, Canadian Blinds Pros often sees this in condo projects where exact fit, clean lines, and reliable operation matter from day one.
If you are figuring out how to install smart blinds, think beyond the bracket and the app. The best result is a window treatment that feels effortless once it is in place – quiet, level, tailored, and ready to match the way you live.